We do early season tomatoes. Like, really early season tomatoes. They get seeded in January, put out mid February, and if all goes well, we have the only local tomatoes on the market for three weeks. Which is amazing for us, IF it works.
OMG Ashley, don't tell everyone your secret! Isn't everyone going to do this? Then you'll lose your early tomato to market niche! Likely not. The work, resources, and risk make this type of crop really unappealing. I've never liked gambling, but here we are...
Below are some pictures that I'll use to show you how we tempt the gods.
 |
| The first, super important element to this process is black plastic mulch. It can raise the soil temperature by 10*F! So if the soil is a cool 50* everywhere else, under the plastic it'll be 60*! Tomatoes are warm season plants and won't do well if it's cold, so this is vital. The other thing this mulch offers is weed supression. Don't get me wrong, weeds will still find a way! Every tiny pinhole is an invitation for bindweed and that big hole around the tomato is going to be weed city in a few weeks. |
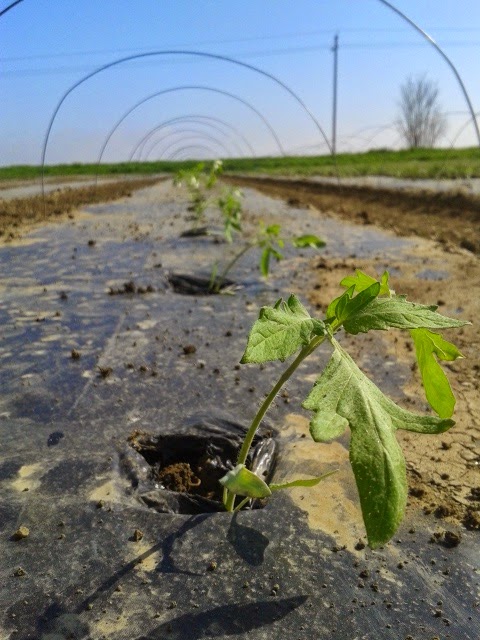 |
| These hoops are the second big thing. They're going to keep the floating row cover off the plants. The row cover will add another 5*, so with plastic and cover, that's a difference of 15*. It won't save the plants from a hard frost, but it will keep them growing, slowly. |
 |
| This is the secret ingredient to extra great tomatoes. Friends! My good friend Kelly came out to help and made what is always a really tough, long day really lovely! |
 |
| Here Kelly is demonstrating good form on pounding stakes. Thes stakes have a specially drilled angular hole that a j-hook slides into catching the rope strung along the bottom edge of the row cover. It's kind of a large scale anchor stitch one might do in embroidery. It does a great job holding the cloth down in the wind. Unless it doesn't...and the string breaks or the cloth rips and you have to go out in 40+mph wind and repair string or use the terrible black clips. |
 |
| Once all the stakes are pounded in, the hooks inserted to hold down the row cover, you're almost done! you will notice here there are two wind breaks on the left side of each triplet cover (there are three beds of tomatoes under each cover). This is tricky business too. Stakes hold and pinch another type of cloth that does a great deal of work "breaking" the wind over the beds (wind-break...get it!?). This is what hope looks like to a farmer. These will come off in 3-5 weeks depending on weather. It MUST come off when the plants start to flower. The pollinators and wind need to get to the plants- or there will be no tomatoes! When that happens, we'll prune, stake and string these guys up and come early June- TOMATOES! (hopefully...) |
 |
| Kelly made a tiny lizard friend at beer time when all the work was done. Our farm is home to a great many vertebrates, and this one is absolutely welcome. They have a big appetite for bugs, spiders, slugs and the like. Eat up friend! |
 | |
| I believe he was coming close so he could thank Kelly for her hard work...maybe... |
Greens Pesto
2 bunches leafy greens
2 bunches assorted herbs
3 green onions
1 1/2 cups olive oil
1/2 cup toasted nuts
3-4 cloves garlic
salt
Chop leathery greens up, but otherwise, toss in a food processor and enjoy!
Last night for dinner I ate this pesto
(with collards, cilantro, parsley, dill, green onion, almonds and the
rest) on top of cheesy polenta topped with bacon and tomato braised
cabbage, onions, and broccoli. It tasted like comfort food, but was
super healthy.
This next recipe is one of my favorites. Yes, it is Indian food, it takes a lot of spices you may not have, no, don't leave them out, and it takes a few more steps than you are maybe used to. Go to the co-op and buy bulk spice, DO NOT WASTE MONEY AT A GROCERY STORE BUYING SPICES. They're also grossly old at big stores anyway, so eww. Come borrow mine even! recipe first, get everything measured out first, then follow the directions carefully, and you will be rewarded with the most delicious curry that is so super healthy!
Palak Panner
1 lb greens (spinach, chard, kale, collards, mustard, anything!)
1" fresh ginger
2 green chilies
1 knob ghee
1 tsp cumin
2 bay leaves
1 onion, minced
1 tsp turmeric
chile/cayenne powder- to taste
1/2 cup water
1 tsp garam masala
splash of cream/soy milk (plain)
paneer cheese or tofu
Remove tough stems from greens if any. Boil briefly (1 minute for soft greens like spinach or chard, maybe two for kale and collards). Drain and drop into a food processor with ginger and chilies. Puree. In a good skillet, lob a hunk of ghee or butter in the pan and toss cumin seeds and bay leaf in until the seeds *POP*SNAP*CRACKLE* then toss in minced onion until the onion is a nice golden color. put in chile powder and turmeric and add puree to pan. Add water and cook for 6-8 minutes until the mixture thickens a bit. Add garam masala and kill the heat. Stir in a splash of cream/soy milk and your cheese or tofu. Serve with brown rice and, DELICIOUS!
No comments:
Post a Comment