Planting good food and cultivating a thriving community and ecosystem

Wednesday, March 26, 2014

Cleaveland- The Last Uni-Turkey and Spring Minestrone

Spring always harkens the return of migratory birds, flowers bursting forth from cold, naked branches, dreams of tomatoes, and many, many babies. For us, the babies in question are chicks and poults. We don't usually let our chickens sit on nests if we can help it- though they're crafty hiders! But, we are trying to continue the Narraganset breed of turkey we currently raise, so we let our turkey hens sit- if they're so inclined. We had an early hatch out of chicks this past Valentine's day. A mamma turkey hen hatched 5 chicken chicks and 4 turkey poults. Yes, she hatched chickens. Despite our best efforts to keep chickens and turkeys separate (the toms can be very aggressive towards chickens), our chickens are truly "free range". They really go where they want.

So, our mamma had a sizable clutch following her this past February. They were painfully cute.

You really couldn't get too close without your body erupting in SQUUUEEEEEEE!

We had some experience with mammas and babies not doing so well in our large open enclosure. Every time we'd go out to feed the birds, it seemed like the mamma hens would have one less baby with them. It could be the ground squirrels (yes, the horrible beasts steal eggs AND babies), it could be crows or other birds of prey, it could even be other chickens or turkey hens. Whatever it is, we were told that the new bird family would do better if we separated them. So, we built them a nice little sub-division. It seemed ok for a few days. Mamma got out- we put her back in. A baby got out, we put it back in. We should have seen it then, but we were perhaps blinded by optimism.

We went out one afternoon to the saddest scene. It seems that mamma got out after we fed them in the morning, and didn't come back. It must've been just a bit too cold, and us just a bit too late, but all 9 babies were lined against the fence, motionless. We piled them up in a box, thanked them for living at our farm, and set out to the compost pile to bury them. I noticed one still kicking. I pulled it up and held its shivering body between my hands hoping to make it comfortable as it left us.
 It seemed to take forever, and it just wrenched my heart that it was struggling so hard. I felt for it, but had things to do, so I did what seemed to make sense- tucked it between my boobs to keep it warm and went on with my chores. It soon stopped shivering, and took up kicking instead.

Pretty sure cleavage was made to support baby birds.
It started peeping loudly, and I allowed a little hope. After a half and hour, it could almost stand again, so we set the poult up in the brooding box with hot water bottles, some food, and water. He seemed frail, but took in food and water, so we crossed our fingers. We giggled naming him cleave-land, and wished him good-night.

Byron was wishing Cleaveland a goodnight. He checked on him every day! He would run out of the car as I got to the farm and run straight to the greenhouse and bark until I opened the door. Cute!

Cleaveland is doing well, he even escaped yesterday when I was changing out the water in the brooder box. Seems he developed some spunk along the way. Lone chicks rarely do well when introduced to the main flock, so we got him some meat-chicken friends. There are 36 babies running amok in the greenhouse brooder, but Cleaveland is clearly larger, and much braver. He is ready for his big trip out to the big coop with this new friends.
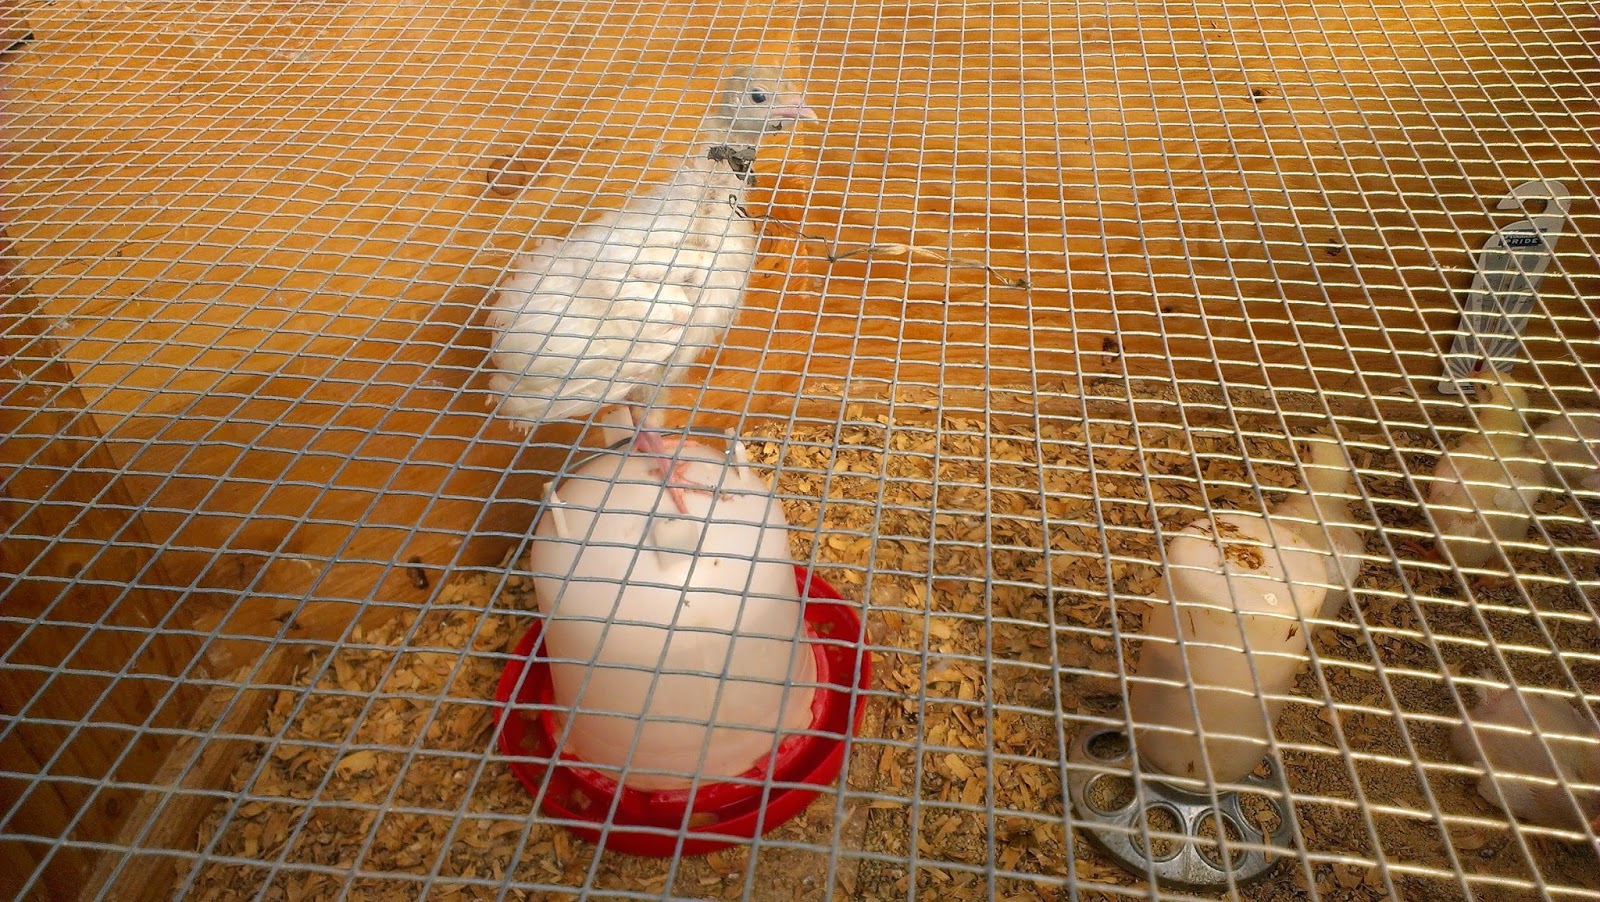
Atop the waterer, Cleaveland plots his escape.

The wins and losses of the farm sometimes seem uneventful during all the (controlled) near-chaos that is running a farm. Rarely are they mourned. Losses in earnings are frustrating and stressful. Crop losses can be anywhere from disappointing to devastating. Though, nothing compares really, to when your animals die. You accept that death is a part of life, but it is always sad...The Grace in farming though, comes in second chances. If you can find the heart and courage to try again, that is.
Two turkey mammas have set up shop out in the back of the poultry enclosure. No one has started to sit yet, but we're hopeful.


Spring is full of second chances and promises of bounty. Here is a great spring soup recipe from Bon Appetit to whet your appetite in anticipation of those promises. It is a great seasonal transition soup. We're still making use of greens and roots, but herbs make a sneak appearance. It's a cozy winter's-end meal.

INGREDIENTS

  • 6 ounces ground chicken (about 3/4 cup)
  • 1/2 cup fresh breadcrumbs
  • 6 tablespoons finely grated Parmesan, divided, plus more for garnish
  • 4 garlic cloves, 2 minced, 2 thinly sliced
  • 2 tablespoons chopped fresh chives
  • 1 large egg, whisked to blend
  • Kosher salt, freshly ground pepper
  • 2 tablespoons extra-virgin olive oil
  • 1 leek, white and pale-green parts only, sliced into 1/4-inch rounds
  • 5 cups low-salt chicken broth
  • 3/4 cup ditalini or other small pasta
  • 1 cup 1/2-inch rounds peeled carrots
  • 1 cup (packed) baby spinach 
 Mix chicken, breadcrumbs, 3 Tbsp. Parmesan, 2 minced garlic cloves, chives, egg, 3/4 tsp. salt, and 1/4 tsp. pepper in a medium bowl. Form into 1/2-inch-diameter meatballs (makes about 28). Heat oil in a small pot over medium heat. Cook meatballs until golden all over, about 3 minutes (they will finish cooking in soup). Transfer to a plate; set aside.

 Add leek to pot and cook, stirring often, until beginning to soften, about 3 minutes. Add 2 thinly sliced garlic cloves; cook for 1 minute. Add broth and 2 cups water; bring to a boil. Stir in pasta and carrots; simmer until pasta is almost al dente, about 8 minutes. Add meatballs; simmer until pasta is al dente, carrots are tender, and meatballs are cooked through, about 3 minutes. Add spinach and remaining 3 Tbsp. Parmesan; stir until spinach is wilted and Parmesan is melted. Season with salt and pepper.

Enjoy!

Saturday, March 22, 2014

Global Weirding and Parsnip Fries

Winter's last warm breaths are breathing life into spring. Though, spring is wearing a face that feels a lot like summer.  It was 80* on the farm the other day. It's all too strange. The first case of West Nile was reported in the central Valley- two months earlier this year than last. As far as I could tell, the bugs never really left. They seem to love the warm dry winter.  The crops seem to love it too, for the time being- as long as the well keeps supplying water that is.

We're lucky for the moment to be so heavily dependent on annuals. We have the freedom to plant- or not plant most of our fields. Though, we will have to rip out every other walnut tree in the back. It was expensive to water them in the first place, but we have other plans now seeing as how droughts are not just a fluke. Drought seems to be a state of existence for California, and we will have to begin taking uncomfortably close looks at the way we live, eat and play. With such dry weather, it may not make sense for us to grow grazing animals on pasture, rice, corn...we may have to reconsider lawns, pools, washing our cars often...it'll be ugly, and we may be unwilling or unable to admit it, but we're all responsible for our natural resources and when they're scarce, we all need to do our part to ensure we're being efficient and prudent.

Prudence for us is less a moral stance, though it has strong roots there, but a decision to stay in business. We're always looking at how we farm and re-evaluating practices to make sure that it makes sense financially, but it isn't wasteful of petroleum products (gas/plastics), water, or energy in general- whether it is ours or from the grid. We're always thinking about energy and nutrient flows on the farm as well, and how we can make each piece work more for us- like using the chickens to clean up fields and having them "process" the waste into something useful for the next planting. We're wondering if we couldn't get pigs to do some plowing or goats to do some weed eradication. We're all part of this ecosystem, and must find the right way to live in it, working with it- even if it's erratic.

Though we're just a few days into spring, things are busy-busy for us. Here are a few things we've been up to:

The one time it did rain hard, of course we had to go out and pick 200 heads of mizuna for the food bank. I finally gave in and took my shoes off. The mud would have taken them anyway...

Most times you don't pick everything from a bed, and it is left along with the weeds until we can get back to it to mow, till, and bed back up. Sometimes though, we don't get to it...and the weeds go to town! With all this shade, the soil would have never died out in time for us to till (putting a few thousand pounds of tractor on wet soil= compaction nightmare). So, I had to get to most of the leafy-weedy canopy by hand. Cool thing about a super sharp hoe? You get these cool cross-sections of roots you hacked! These are old chioggia beets!

Here is a cross section of radishes that have grown in together. How cool is this?

The blackberries we grow must be trellised each winter. It is a grueling, sharp, nasty job. Alain and Anna of Full Circle plugged away dutifully this winter and got most of them done. Here, I came to help one afternoon, and loyal to a fault, Byron just couldn't leave my side, nor stay put on his "safe space" of cardboard I made him. He HAD to be right next to me. he was tired of the sharps on his tiny dog feet and decided to hitch a ride while I was trimming roots.

Farming can be rough on small red dogs.


While we wait for spring to share the promises of her bounty, we must savor the last of our winter roots. Parsnips are an under-appreciated vegetable in my humble opinion. Ugly as they may be, and unpleasant raw to boot, cooking them unleashes a tender, sweet side that has hints of anise flavor. Here is a recipe for parsnip fries that will knock your socks off and seriously impress your burger. The recipe comes from Bon Appetit. Serve it with lemon-garlic aoili and relish this novel new friend you've made.

INGREDIENTS

  • 2 1/2 pounds parsnips or carrots, peeled, cut into about 3x1/2-inch strips
  • 1 tablespoon finely chopped fresh rosemary, plus 5 sprigs rosemary
  • 1 large garlic clove, minced
  • 3 tablespoons olive oil
  • Kosher salt, freshly ground pepper
  • 1/2 teaspoon (or more) ground cumin  
Preheat oven to 450°. Mix parsnips, chopped rosemary, garlic, and oil on a large rimmed baking sheet. Season with salt and pepper and toss to coat. Spread out in a single layer. Scatter rosemary sprigs over.

Roast for 10 minutes; turn parsnips and roast until parsnips are tender and browned in spots, 10–15 minutes longer. Crumble leaves from rosemary sprigs over; discard stems and toss to coat. Sprinkle 1/2 tsp. cumin over. Season to taste with salt, pepper, and more cumin, if desired.


Sunday, February 9, 2014

Planting Peas, Winning at Homemade Stock and Making Potage of Turnip

It's been awhile, I know. It was easy to remember to keep posting when I had my weekly routine of veggie boxes. I felt I had a responsibility to help you all to enjoy the veggies we grew for you in the tastiest way possible. BUT! Even though the veggie boxes have been put on pause, I'm definitely still out farming! I put in some snap, snow, and shelling peas a few weeks back.

When planting beans, it's a good idea to inoculate them. They need a specific organism to live on their root nodules to help them fix nitrogen from the air.

This organism apparently can be powdered like Kool-Aid and with a few sprinkles of water will adhere to the peas. They'll live together in symbiotic harmony making us eats. Aww how romantic. ,

Here is an experimental solution to the problem of the snaking drip. With normal irrigation, the drip tape expands and contracts and moves all over, usually far from the line of seeds or plants it needs to water. You can pin it in place with J-hooks (tent stakes), but you'll have to find them all and undo them to weed. Here, you just unhook one and flip the tape off, weed, and flip it back on. We'll see how this does...

The peas sadly won't be with us until April. And, if you're trying to keep to a habit of eating seasonally, you may be sick of the sight of root vegetables. I mean, really, how many roasted roots can you eat? Well, for me the answer is one or two pans a season. I'm really not a fan. I'm more of a soup girl myself. For me, it's the perfect winter meal. It's usually pretty inexpensive. With soup, just a few slices of bread and butter or a grilled cheese- and- BAM! It's a meal. Also, it makes great left-overs. But, soup Ashley, how boring?! True, you may have been slighted by sad soups in the past: the stuff out of a can leaves something to be desired. I'd like to share some secrets to making a damned good pot of soup that will quickly turn your boring roots into creamy bliss.

First: The stock.

Make it. If you're a really busy person, you're probably going to roll your eyes and tell me no. Fine, I get it. Being a busy modern person is hard, and there is little patience ever left to make stock, let alone dinner...and the dishes from dinner. But, it's secretly super easy. No measurements, cutting, stirring...Just toss stuff in a pot and let it go! Also, the thought of commercial stock being made out of industrial vegetable/animal scraps doesn't really do it for me...

Veggie Broth:

Please don't buy things to make stock out of. It's kind of expensive, and definitely wasteful. If you make veggie dishes regularly, and have a plastic bag and a freezer- you're good to go! Every time you make dinner, take the onion ends, leek tops, carrot peels and ends, beet greens, chard stems, potato nubs and peels, fennel tops- whatever you're going to throw out- and toss it in a bag in the freezer instead. When said bag is full, it's stock time! Toss the whole bag into a big pot ideally filling said pot nearly to the top with veggies, fill with water and set on stove. Add bay leaves, dried herbs, fresh herbs, and peppercorns. Wait to salt until the end. Boil for a few hours, or a half hour. Whatever time you have! Strain, and store in the freezer, fridge, or pressure can that goodness!

 But! What if I don't have all the right stuff? I mean, aren't I supposed to have carrots and celery and onions? Meh. I mean, you can be persnickity with all that, but I haven't found it to be necessary. I've made great broth with only leek tops and fennel bits. It's just vegetable flavored water in the end. Speaking of specific broths...

Garlic Broth:

This is my super secret weapon to the best soup ever. You might have to buy garlic for this, unless you're a garlic monster like me and have handfulls of inner cloves that are just too silly to peal crowding your garlic bowl/basket. Grab your big pot and guess how many heads of garlic would fit in a single layer on the bottom (probably 5-10). Cut the heads of garlic in half so that all the cloves are in half. No, you don't need to peel them. Toss in pot and add your bay leaves, fresh and dried herbs, peppercorns, and salt at the end. Boil for awhile. A few hours is best, but just one will do. Strain and store! Use this and veggie broth wherever chicken stock or water is called for in soup.

Chicken Stock:

Save your carcasses! Just like the veggies, toss them in a good freezer bag. Guts too! When you have at least two full sets of bird bones, toss them into a broiler until they get all golden colored (this gives that nice golden color to your broth...naturally). Add veggies if you want, but they're not necessary.   Toss roasted bones and any fat into your big pot and fill with water. Add your bay leaves, peppercorns, and herbs.You most definitely want to give the bones a good long boil, at least an hour, if not two or three. You will get a richer taste the longer you boil. Feed any meaty bits to your pets, strain, salt to taste, and store!

O.K. so, that proves it's simple, I mean you just toss stuff in a pot and let it boil...I can manage that. But, is it worth it? YES! It is worlds cheaper- I mean, you are using things you'd normally throw away, so that makes it near no cost. You know where the ingredients come from, you know you aren't going to store it in something that is hazardous to your health, and it TASTES MUCH BETTER! I promise. Give it a try. One big pot of stock usually lasts me a few months, and I am a soup beast.

Cool, so I have this great homemade stock... What's this about turnip soup? This soup: Potage of Turnip, comes from my soup bible- Soup: a way of life by Barbara Kafka. It's a cozy winter soup that transforms your roots into a creamy pot of sweet and savory deliciousness. Feel free to change out the roots or add extras.

Potage of Turnips

1/2 lb potatoes diced
1 turnip diced
3 carrots, sliced
1 onion, diced
4 cloves garlic
2 ribs celery
1 Tbs butter

Bring all veggies to a boil in 4 cups broth. Simmer 20-25 minutes until the roots are tender. Melt butter in soup and pureé vegetables. 

Enjoy! Let me know if you have any secrets to turning your roots into tasty magic!


Wednesday, December 18, 2013

Stuffed Pumpkin

   I have been planning holiday meals this past week and have come across too many good things that I can't possibly justify cooking all of them. This one though caught my eye. I am so excited to share this one around my table this Christmas. I noted that there were just enough big pumpkins for everyone to try this recipe (if you got your box after I saw it Wednesday, that is). If not, you can scrape out a butternut or even a big sweet potato and scale down the recipe slightly!

   The recipe comes from Martha Stewart. It's her Pumpkin stuffed with everything nice. There is a video on her sight if you learn better visually.
Pumpkin Stuffed with Everything Good


Ingredients
  • 1 (3-pound) pumpkin
  • Coarse salt and freshly ground pepper
  • 1/4 pound stale bread, thinly sliced and cut into 1/2-inch cubes
  • 1/4 pound Gruyere, Emmenthal, or cheddar cheese (or a mix of all three), cut into 1/2-inch cubes
  • 2 to 3 cloves garlic, split, germ removed, and coarsely chopped
  • 4 slices bacon, cooked until crisp, drained, and chopped
  • 1/4 cup chopped fresh chives or sliced scallions
  • 1 tablespoon minced fresh thyme
  • 1/2 cup heavy cream
  • Pinch of freshly grated nutmeg
Directions
  1. Step 1

    Preheat oven to 350 degrees with a rack set in the center of the oven. Line a baking sheet with a nonstick baking mat or use a Dutch oven that is slightly larger in diameter than your pumpkin (in which case, you will need to serve your pumpkin from the Dutch oven, as it may stick, but it will keep its shape better this way).
  2. Step 2

    Using a sharp, sturdy knife, cut off top of pumpkin, working around the top with the knife inserted at a 45-degree angle to cut off enough to make it easy to work inside the pumpkin; reserve top. Remove seeds and strings from cap and pumpkin. Season inside of pumpkin generously with salt and pepper. Place on prepared baking sheet or in Dutch oven; set aside.
  3. Step 3

    In a large bowl, toss together bread, cheese, garlic, bacon, chives, and thyme until well combined. Pack into pumpkin; it should be well filled but not overstuffed. You may need to add some bread and cheese or some of the filling may not be necessary to use. In a small bowl, stir cream and nutmeg to combine. Pour over filling; filling should be moist but not swimming in cream -- you may need to use more or less accordingly.
  4. Step 4

    Place top on pumpkin and transfer to oven; cook until filling is bubbling and pumpkin flesh is tender, about 1 hour and 30 minutes. Remove top and continue baking until liquid is slightly evaporated and top of filling is browned, 20 to 30 minutes more.
  5. Step 5

    Carefully transfer pumpkin to a serving platter (or serve in Dutch oven, if using) and serve

    Let me know how it turns out!

Tuesday, December 17, 2013

Recipe of the Week: Basic Roasted Roots

   I got a pressure cooker in the mail the other day. For those of you that enjoy cooking, you may understand my excitement. I got into canning a few years back. I jammed, preserved...I even made a "jam jam"- an entire playlist of food related songs. I thought it was terribly clever, there was Strawberry Fields, Blueberry Hill, Raspberry Beret. But, you can't can everything. Some foods are low acid and aren't safe to just water bath can. Pressure cookers are pricey so I put it off and just stuffed my freezer creatively when I made broth

   The breaking point for me was the 10 pounds of spare garlic I took home after last week's garlic planting. The dinky ones aren't worth planting, but they are worth making garlic broth out of. Garlic broth is one of those low acid things that cannot be water-bath canned. I had so, so much of it. So, I learned how to pressure can garlic broth. This also happened on the same night I pickled some of that garlic and canned that too for Christmas presents. It was also the same night I made this amazing peppermint meringue cookies for my wife's office party. Word to the wise, even if you check the humidity outside to ensure your meringue will turn out, if you are water-bath canning indoors, it will fail. Sorry Tarra...

   We've been finishing mulching our strawberries these past few weeks. We're still experimenting with trying to reduce labor and weeds, plant them at the right time, and take care of them in a way that doesn't ruin our backs or knees. For now, we're laying drip first, transplanting, laying mulch and cutting slits. We'll see how this goes.

Go tiny berry plant!

Lord Byron Buttons loves when he gets to go out to the farm and help. He is such a skinny guy though, he needs a jacked to keep warm. He's not so good with strawberry help though, he does like to nibble the leaves when you're not watching.

   We also use plastic mulch to keep plants warm in addition to keeping them weed light. Robert is transplanting quite a few plants out now for a seed crop next year. It's pretty late to do so, and it's not ideal, though, I hope you've noticed by now little of farming is ideal. Here's what 30 beds of plastic mulch looks like:

Robert is using the mulch layer implement to cover a bed with the plastic mulch.

The end of the mulch needs to have the drip line pulled through the top and be tucked in.

Here is a tucked end. The drip line will be cut shorter and have an end put on.

Looks a bit like water to me.

Here is a gratuitous picture of my dog in his coat pretending to be a chicken.


   I wanted to share another recipe with you that might help take care of some of your surplus roots you might have lurking in your veggie drawer. Roasting is always a good idea to deal with a root that you can't stand raw. Roasting brings out roots' natural sweetness and turns them into pleasing cubes of golden tinted treats. Here is a basic recipe with some ideas for snazzing it up:


Basic Roasted Roots

10 C cubed roots
4 Tbs Olive oil
Sprinkle Salt

Preheat oven to 400. Place cubed roots in a dish and cook for 30 minutes until fork tender.

Boring, I know. But, there are endless ways to make this staple interesting!

-Use all beets and add slices of orange in between the roots. When cooked, add toasted nuts, soft goat cheese and chives

-Use Turnips, radishes, rutabaga or other sharp flavored roots and add rosemary to roast. When cooked, add maple syrup and a spritz of lemon juice and zest

-Mix it all up and add full heads of garlic and slices of lemon. When cooked smash it all up on good bread

-Roast winter squash or pumpkins and add garlic, sliced chilies and oregano

-Add mixed fresh herbs. When cooked drizzle with a balsamic reduction

-Serve roasted roots over a whole grain to make a complete meal

Have fun! Let me know if you have any great home-recipe secrets for roasted roots!
-

Recipe of the Week: Turnips with Bacon and Pickled Mustard Seed


    It's belated, I know. Things have been busy for me. The holidays are creeping up- and for me that means thoughtful, homemade gifts for everyone. My birthday was also last week. I am working on my first ever crop plan that is proving quite a task. I keep thinking, "Ok, I need a bunch of carrots for 15 boxes for...say..3 weeks? Will people be tired of carrots by week 3? No, 3 weeks is good. So, 15 bunches for 3 weeks is 45 bunches. So, how many feet is that? Well, there is about 10 carrots per foot and there are 4 rows of carrots...but how many in a bunch?" So, sufficed to say, things are slow going. There is so much I don't know that it is really slowing me down. Se la vie. 
 
    We planted our garlic this past week. Here is how it went:
At the 8 a.m. garlic "crack party". Only big cloves are worth planting, so they must be separated.

My view while cracking out garlic. The fire was warm and there was tea. Those are my favorite kinds of farm chores.

Sorted, counted and ready to be planted!

You can see we were painstakingly precise as we threw them...right? Lol, no worries- is food, will grow!

My lovely wife, Tarra poking in the garlics and braving the cold. 


 Things are still busy out here on the farm. With the CSA boxes and the Food Bank and School District crops, there isn't that lull in season you might expect. I mean, there is never a "break" but there is pretty busy come spring, super busy come summer, super mega busy come fall, and busy come winter. Well, all of that is totally relative to what you're growing too... my point is that there is still a lot of messing around with the crops while the tools need caring for, the cold frame needs organizing, cover crops planted, orchards tended to... I need more arms. 

   The roots are the things that seemed to do best in the freeze. I have been taking it easy on the greens since the frost, they just all look so sad! While they recover, you'll notice your boxes have a great variety of things grown underground. I would hate to think you're getting bored of something, so I wanted to share this recipe for turnips that my family LOVED this Thanksgiving. The recipe is from Bon Appetit magazine, my guilty reading pleasure. I added the turnip greens in on the action too. Remember that most roots that come to you with greens are EDIBLE!


Turnips with Bacon and Pickled Mustard Seeds

  • ¼ cup sugar
  • ¼ cup white balsamic vinegar or white wine vinegar
  • ¼ cup yellow mustard seeds
  • 1 tablespoon vegetable oil
  • ¼ pound thick-cut bacon, cut crosswise ¼” thick
  • 1 tablespoon whole grain mustard
  • 2 pounds baby turnips, trimmed, halved or quartered if large
  • Kosher salt and freshly ground black pepper
  •  
Bring sugar, vinegar, and ¼ cup water to a boil in a small saucepan. Remove from heat and stir in mustard seeds. Let stand at least 4 hours, or cover and chill up to 12 hours.
Heat oil in a large skillet over medium heat; add bacon and cook, stirring occasionally, until brown and crisp, 8–10 minutes. Using a slotted spoon, transfer bacon to a small bowl and stir in pickled mustard seeds and whole grain mustard; set vinaigrette aside.
Meanwhile, cook turnips in a large pot of boiling salted water until tender, about 3 minutes. Drain and pat turnips dry.
Heat a large skillet over medium-high heat. Add turnips and vinaigrette and cook, tossing, until warmed through, about 2 minutes; season with salt and pepper.

Wednesday, December 4, 2013

Jerusalem fartichokes...ahem, artichokes

What on earth is this knobby muddy thing in my box? What you have there, friend is, according to Wikipedia, knower of all things, "The Jerusalem artichoke (Helianthus tuberosus), also called sunroot, sunchoke, earth apple or topinambour" I'm especially fond of that last one.

It's a tuber of a tall, sunflower-looking plant. Come fall, the 10 foot plus flowered top dies back and the roots cure there skins preparing for the winter, much like potatoes. Unlike potatoes, they're not very starchy. They're made mostly of inulin which breaks down into fructose so it doesn't spike your blood sugar quite so much. This makes a good case for swapping this bad boy for potatoes in your cooking if you are concerned about such things.

Here they are hanging out with some sweet potatoes I dug today:
A tuber only a mother could love...


Dear wiki also informs me that in Germany, "over 90% of the Jerusalem artichoke crop is used to produce a spirit called Topinabure, "Topi" or "Rossler".By the end of the 19th-century Jerusalem artichokes were being used in Baden to make a spirit called "Jerusalem artichoke brandy,". So, it seems like you have the makings of booze as well as noms.

You may also have noticed a slight...misspelling...of sunchoke in my title. They've got a reputation, a bad one at that. Bon Appetit has a interesting article here about it. I've never had such trouble, but fartichoke is waay to funny not to use in a sentence. If you don't have time to read that, it recommends peeling them if you think you have a sensitive digestion. 

Don't be put off though, these funny looking tubers are a culinary treat. They have a unique texture and a light nutty, earthy, mushroomy, artichoke flavor that is sure to steal the show in anything they're cooked in. Here are some great ideas from VegParadise in this article.


STORAGE: Keep the tubers wrapped in plastic and refrigerate. They will keep up to two weeks, but it's always best eat them as fresh as possible for the best flavor and nutrition. Their sweetness is known to increase when refrigerated after harvesting. If you grow your own, refrigerate them for a day or two before consuming.
PREPARATION: Scrub the sunchokes clean with a vegetable brush. Since much of their nutrients are stored just under the skin, it's best not to peel them. Once cut, sunchokes discolor quickly, so it's best to cut them close to serving time, or cut and immerse them in water with lemon or vinegar to prevent oxidation. Cooking them with the skins on may cause a darkening of the skins because of their high iron content.
RAW:
Slice sunchokes and enjoy the crunch they add to your salad.
Slice and serve them along with crudites and dips.
Shred them into a slaw. Dice them into a chopped salad.
Slice, dice, or shred and marinate in a little extra virgin olive oil and lemon juice or rice vinegar
Coarsely chop sunchokes and add to the blender when preparing raw soups.
STIR FRY: Slice, dice, or shred and stir fry along with other fresh vegetables in a little extra virgin olive oil. They will become softened in about 4 to 6 minutes. For a tender crisp texture, stir fry about 2 to 4 minutes.
BAKED: Sunchokes can be baked whole or sliced. Toss them in a bowl with a little extra virgin olive oil and place on a baking sheet. Set the oven temperature at 375 and bake 30 to 45 minutes for whole, and 20 to 25 minutes for sliced, turning them half way through. Season with salt and pepper to taste.
STEAMED: Coarsely chop the Jerusalem artichokes and put them into a steamer basket. Cover and bring to a boil over high heat. Continue at high heat and steam for 5 to 8 minutes. Test for softness. Remove and season to taste or mash like potatoes.
BOILED: Sunchokes can be boiled whole or cut as desired. Bring a covered saucepan of water to a boil over high heat. Add sunchokes and boil for 10 to 15 minutes for whole, and 5 to 8 minutes for cut up. Season as desired or mash like potatoes.

 Ok, but if they're a treat, what can I do to really enjoy them? Glad you asked! Here are a few recipes I dug up:

This one's from Jamie Oliver.  It's a sauteé with bay leaves.

To serve 4, you will need 600g/1lb 6oz of Jerusalem artichokes. Peel them, then cut them into chunks. Place them in an oiled frying pan and fry on a medium heat until golden on both sides, then add a few bay leaves, 2 cloves of garlic, finely sliced, a splash of white wine vinegar, some salt and pepper, and place a lid on top. After about 20 to 25 minutes they will have softened up nicely and you can remove the lid and the bay leaves. Continue cooking for a couple of minutes to crisp the artichoke slices up one last time, then serve straight away. Personally, I think they go well with both meat and fish and are particularly good in a plate of antipasti, or in soups or warm salads. 

Here is a fancy soup from Simply Recipes

Ingredients

  • 2 Tbsp unsalted butter
  • 1 cup chopped onion
  • 2 celery stalks, chopped
  • 2 large garlic cloves, chopped
  • 2 pounds jerusalem artichokes, peeled and cut into chunks
  • 1 quart chicken stock (use vegetable stock for vegetarian option, and gluten-free stock if cooking gluten-free)
  • Salt and black pepper to taste

Method

1 Heat the butter in a soup pot over medium-high heat and cook the onions and celery until soft, about 5 minutes. Do not brown them. Add the garlic and sauté for 1 minute. Sprinkle with salt.
2 Add the jerusalem artichokes and the chicken stock to the pot and bring to a simmer. Reduce the heat to low, and simmer, covered, until the jerusalem artichokes begin to break down, 45 minutes to an hour.
3 Using an immersion blender or upright blender, purée the soup. If using an upright blender, fill the blender bowl up only to a third of capacity at a time, if the soup is hot, and hold down the lid while blending. Alternately, you can push the soup through the finest grate on a food mill, or push it through a sturdy sieve. Add salt to taste.

Here's a nice salad from Epicurious. It pairs sunchokes with arugula and Parmesan.

Ingredients
  • 2 tablespoons orange juice
  • 1 tablespoon plus 1 teaspoon red wine vinegar
  • 1 teaspoon Dijon mustard
  • 5 tablespoons extra-virgin olive oil
  • 1 pound Jerusalem artichokes, trimmed, peeled, thinly sliced
  • 1 5-ounce bag arugula
  • 2 ounces Parmesan cheese, shaved
Preparation

Whisk orange juice, vinegar, and mustard in small bowl to blend. Gradually whisk in oil. Season vinaigrette to taste with salt and pepper. (Can be made 1 day ahead. Cover and refrigerate.)
Combine Jerusalem artichokes, arugula, and Parmesan in large bowl. Drizzle with vinaigrette and toss to coat. Divide among 6 plates and serve.


 However you choose to enjoy them, have fun! This is that adventure part I was talking about when we first started. If you don't like it, keep them as stocking stuffers for family members you don't quite like either. If you do something particularly cool with them, let me know! Enjoy!