Planting good food and cultivating a thriving community and ecosystem

Wednesday, March 25, 2015

STRAWBERRIES!!!!!1!

It's that time of year again! Strawberries! I blogged last year about how We grow strawberries, which you can read here as well as enjoy an adventurous recipe for strawberry soda, so this year I wanted to talk about how strawberries themselves grow. It's pretty magical that a flower turns into a fat, red, ripe, juice berry. I'll take you down this pictorial journey then share an amazing recipe for strawberry pie!
If you come visit our farm anytime in April-June you're likely to run into this fancy sign somewhere. There are a few signs leading up to it helping people find their way from the parking lot to our U-Pick berry plot.
The first step a plant takes to creating it's fruit is a flower. These beauties glow a radiant white that contrasts so beautifully against the black plastic and the green leaves.
The bees can't resist their radiant beauty. They can be found buzzing away happily in the berry plot all season. Here is one coming in for a landing.
Busy bee doing very important pollination work.
Once the bee has done her work and the flower is pollinated, the petals dry up and fall off.
The flowers center begins to swell and develop seeds. Strawberries are an odd fruit in that their seeds are on the outside.
Most plants have berries and flowers at many different stages all at once. It seems like a berry that isn't ripe in the morning, will ripen up by evening, so there is always something to pick! Wednesdays or really early Friday is best. Weekends are usually our busiest, so by Sunday afternoon, there isn't much left. We're open 24 hours, so, if you'd like to U-pick and watch the sunrise- go for it! you'll have the berry patch to yourself!
The first berries of the season are always the largest. We grow only Chandler's, a variety developed by UCD for U-pick. They ripen fully red and are tender and juicy. This makes them delectable fresh, but horrible at shipping. They end up mush when in transit...so fresh picked is the only way! I usually don't have to tell people to eat them quick, they're so delicious, they don't last that long!
I sometimes pick a basket of berries for our farm boxes as a treat. Though, I once did enjoy U-pick, but I-pick as my job is not as fun so I don't let people get used to always having a basket picked by me. It's a lot of work to pick 12 baskets in one day! 


 This recipe is so awesome. It makes the best use of seasonal produce: citrus and berries. I do reccomend letting the custard set for the full time.... I didn't and the strawberries made it melt. Not that it wasn't delicious, it was just...melty. Also, do what you want so far as crust. I can't ever make it work so I buy the whole wheat spelt ones from the co-op in the frozen isle. Maybe you're cooler than me and can make it happen- this pie would be amazing with a graham (ooh or chocolate graham) cracker crust. But, do what you can!


Strawberry Lemon Pie  

1 pie crust- blind baked

Custard:
1 C sugar
10 TBS butter
4 eggs
1/2 C lemon juice
zest of 2 lemons

Bring out your double boiler. Don't have one? Get a wide, low pot fill half way with water and stack a metal or glass bowl on top (DON'T be lame and use plastic). BAM now you're double boiling! Toss everything in and bring water to boil and cut the heat back to maintain a slight simmer in the water . Whisk the curd gently until it becomes thick and the first bubble forms. Don't let it boil, you'll scramble the egg, and it will be eww. Strain through a fine mesh (like a tea strainer)- or don't, I didn't there are just cooked egg bits that will set. Place in a new bowl, cover with a lid or wrap and let set for two hours or make this a day ahead. 

When custard is set, spoon it into the cooled blind baked pie shell and smooth out with a spatula.

Slice up a whole boat load of berries and stack them on top of the custard. If you want to be fancy, melt some chocolate and pour over, maybe dust with cocoa powder or powdered sugar...just go for it! I personally heated up some strawberry cardamom jam I made last year and poured it on top. You could even go with some whipped cream?! 

Let me know how it turns out!

Friday, March 6, 2015

Early Season Tomatoes and TWO Great Ways to Enjoy Greens!

Even though spring is a ways away, man, it sure feels like it's here! We have strawberries earlier than we ever have, the "March" winds started in February, and it's 70* outside!? So weird. Well, it would seem weird to tell you our tomatoes have been in the ground for nearly 3 weeks had I told you this maybe 5 years ago...but maybe with it being so warm, it's not at all surprising.

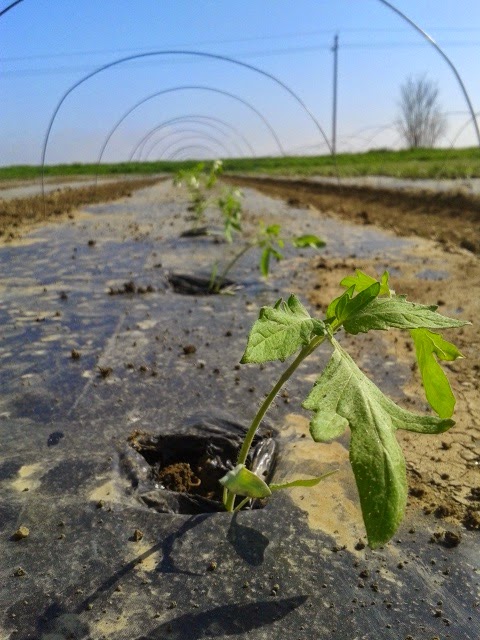
We do early season tomatoes. Like, really early season tomatoes. They get seeded in January, put out mid February, and if all goes well, we have the only local tomatoes on the market for three weeks. Which is amazing for us, IF it works.

OMG Ashley, don't tell everyone your secret! Isn't everyone going to do this? Then you'll lose your early tomato to market niche! Likely not. The work, resources, and risk make this type of crop really unappealing. I've never liked gambling, but here we are...

Below are some pictures that I'll use to show you how we tempt the gods.


The first, super important element to this process is black plastic mulch. It can raise the soil temperature by 10*F! So if the soil is a cool 50* everywhere else, under the plastic it'll be 60*! Tomatoes are warm season plants and won't do well if it's cold, so this is vital. The other thing this mulch offers is weed supression. Don't get me wrong, weeds will still find a way! Every tiny pinhole is an invitation for bindweed and that big hole around the tomato is going to be weed city in a few weeks.

These hoops are the second big thing. They're going to keep the floating row cover off the plants. The row cover will add another 5*, so with plastic and cover, that's a difference of 15*. It won't save the plants from a hard frost, but it will keep them growing, slowly.

This is the secret ingredient to extra great tomatoes. Friends! My good friend Kelly came out to help and made what is always a really tough, long day really lovely!

Here Kelly is demonstrating good form on pounding stakes. Thes stakes have a specially drilled angular hole that a j-hook slides into catching the rope strung along the bottom edge of the row cover. It's kind of a large scale anchor stitch one might do in embroidery. It does a great job holding the cloth down in the wind. Unless it doesn't...and the string breaks or the cloth rips and you have to go out in 40+mph wind and repair string or use the terrible black clips.

Once all the stakes are pounded in, the hooks inserted to hold down the row cover, you're almost done! you will notice here there are two wind breaks on the left side of each triplet cover (there are three beds of tomatoes under each cover). This is tricky business too. Stakes hold and pinch another type of cloth that does a great deal of work "breaking" the wind over the beds (wind-break...get it!?). This is what hope looks like to a farmer. These will come off in 3-5 weeks depending on weather. It MUST come off when the plants start to flower. The pollinators and wind need to get to the plants- or there will be no tomatoes! When that happens, we'll prune, stake and string these guys up and come early June- TOMATOES! (hopefully...)

Kelly made a tiny lizard friend at beer time when all the work was done. Our farm is home to a great many vertebrates, and this one is absolutely welcome. They have a big appetite for bugs, spiders, slugs and the like. Eat up friend!

I believe he was coming close so he could thank Kelly for her hard work...maybe...
This week, I realize I am behind and owe you some recipes! Fine, how about TWO ways to enjoy greens?! The first one will hopefully cure some late winter blues and will take your taste buds on a mini vacation to summertime!

Greens Pesto

2 bunches leafy greens
2 bunches assorted herbs
3 green onions
1 1/2 cups olive oil
1/2 cup toasted nuts
3-4 cloves garlic
salt

Chop leathery greens up, but otherwise, toss in a food processor and enjoy! 

Last night for dinner I ate this pesto (with collards, cilantro, parsley, dill, green onion, almonds and the rest) on top of cheesy polenta topped with bacon and tomato braised cabbage, onions, and broccoli. It tasted like comfort food, but was super healthy. 
 
This next recipe is one of my favorites. Yes, it is Indian food, it takes a lot of spices you may not have, no, don't leave them out, and it takes a few more steps than you are maybe used to. Go to the co-op and buy bulk spice, DO NOT WASTE MONEY AT A GROCERY STORE BUYING SPICES. They're also grossly old at big stores anyway, so eww. Come borrow mine even! recipe first, get everything measured out first, then follow the directions carefully, and you will be rewarded with the most delicious curry that is so super healthy!

Palak Panner

1 lb greens (spinach, chard, kale, collards, mustard, anything!)
1" fresh ginger
2 green chilies
1 knob ghee
1 tsp cumin
2 bay leaves
1 onion, minced
1 tsp turmeric
chile/cayenne powder- to taste
1/2 cup water
1 tsp garam masala
splash of cream/soy milk (plain)
paneer cheese or tofu

Remove tough stems from greens if any. Boil briefly (1 minute for soft greens like spinach or chard, maybe two for kale and collards). Drain and drop into a food processor with ginger and chilies. Puree. In a good skillet, lob a hunk of ghee or butter in the pan and toss cumin seeds and bay leaf in until the seeds *POP*SNAP*CRACKLE* then toss in minced onion until the onion is a nice golden color. put in chile powder and turmeric and add puree to pan. Add water and cook for 6-8 minutes until the mixture thickens a bit. Add garam masala and kill the heat. Stir in a splash of cream/soy milk and your cheese or tofu. Serve with brown rice and, DELICIOUS!

Monday, February 9, 2015

Farming for the environment and a winter time pizza party


 It's been awhile, I know. I've been doing some battling with computers lately, and it has put me back on posting here. Namely I have a perfectly good laptop, but my OS is apparently too old to run most applications. Apparently 5 years is criminally long to hold on to something that cost a whole month's wages...

Anyway, I have also been away so long because Tarra and I had a Leminy Snicket type series of illness. She fell off her bike and broke her arm, got a fever that topped out at 103*. So for her it's been in and out of doctor's, othopedics, radiology, physical therapy- offices. I then cut a good hunk nearly off the end of my finger with a V-slicer got two 102* fevers two weeks apart and have just felt... off since. This has all been playing out since Thanksgiving, and has just recently been just O.K. 

The good news you'll likely assume is that I am self-employed as a farmer and it is winter, so this is the perfect time to be sick because nothing is really happening...right?! Nope. Being self-employed and not going to work means- yes, there is no one to call in sick to (well, besides your farming partner) but because you don't go in, things don't get done! If nothing is getting done, it puts you more behind and an already really, really, really low profit margin gets squeezed. But also, winter is a slower time, meaning there are 40 hours of work to be done, not 70, so missing work is a big deal. 

What on earth are you doing on a winter day? Well, things are still growing, so picking those for veggie subscription boxes, weeding, cleaning up fields, pulling drip tape, organizing tools. What we also should be doing is repairs and maintenence too like fixing the 4 wheel drive on the tractor fixing the other tractor, and countless other things. So even when you're done, you're really never done. 

Wait, what if it's raining, surely there's rest to be had. Nope. Sorry to be such a wet blanket about this but, there is greenhouse work. We've been having rat trouble in the greenhouse. Last spring a rat ate several thousand dollars of potential crops. So we are building rat proof tables. There's taxes coming, book keeping, planning. And even sometimes doing things in the rain...

So, again- why am I doing this? This sounds like an awful lot of work for $3-5 an hour... why? 

One thing I have noticed this winter is how much our farm really does for the environment. We have been planting habitat plants out at our pond in the back. The plants are all natives, some of them flowering for beneficial insects and bees, some of them are habitat for birds and small vertebrates, and the water itself attracts a fair number of animals.  We've seen egrets, cranes, king fishers, Canadian geese, wood ducks, mallards, red winged black birds, kites, red tailed hawks, and many many more birds. There are also lizards, snakes, frogs, toads, rabbits, hares, cayotes, racoons, opossums and every body else! we've even planted milkweed in hopes of the Monarchs finding us!All of that seems pretty worth working my bottom off for, doesn't it?

I think our 40 acre patch is especially important as we are one of very few sets of organic farms in the area. We are a safe haven for these animals with little to no pesticides applied. Here are some pictures of other ways we help animals find safe harbor and how they take us up on it!


Here we've let some broccoli go to flower, mostly because we couldn't pick all we grew. Here on the right you can see a honey bee taking advantage of the rare nectar and pollen in January. The insect in the center is actually a hover fly. It is a beneficial insect, hunting our "pest" insects.
Here's another great picture of the bees enjoying our benign neglect.
We have an owl somewhere in the area. Here is an owl pellet I found and dismantled. Owls eat their prey whole, fur bones and all! The fur and bones can't be digested though and must come back out. Much like a cat-hair ball, they vomit these "pellets" on the wing. Here you can see this owl has taken some kind of small bird and rodent. I am glad to know they are enjoying our all you can eat rodent buffet!
Native bees are strange houseguests. They prefer holes in old logs, or simply to dig a tunnel to overwinter. Here is a set up for those of them who enjoy the holes in trees.
The mud clogged holes mean someone has taken us up on the offer of free housing!
Here is another version of the same idea
Here is one of two- two hundred foot rows of beefwoods. These large conifers are a favorite perching spot of our predator birds. We also have probably several thousand feet of "hedgerow". These are linear plantings of native species intended as either habitat or food for beneficial insects and animals. Things like yarrow, elderberry, milkweed, native grasses and the like all separate our fields and provide our friends with what they need in return for their hard work!
Here is our pond out back at its most beautiful. The bird in the center is a red winged black bird. They're quite the choral group. Each morning and evening they sing to the sun. Its really beautiful

 
Here is the egg case, or ootheca, of the praying mantis. We find these everywhere on tomato stakes, old weed stocks, sides of pallets. The mother mantids try to leave these somewhere safe, dry, and free from predators. Mantids are great predatory bugs and we are always grateful for their help!

   
  This week's recipe is a favorite go to for lazy weekday meals. Its the perfect way to learn to love new veggie combinations and to soothe the omnipresent "bad food" cravings. Pizza! But homemade pizza with slightly healthier crust and full of veggies. Skip Trader Joes dough and try your own! Here is a great no knead recipe that you whip up the night before and just put a lid on! It is ready the next night! Make a double batch and keep it covered tightly with a lid or plastic in the fridge for up to a week (if it lasts that long!). I like to substitute half whole wheat to keep the carb load down. 

Here is the recipe from Bon Appetit: http://www.bonappetit.com/recipe/no-knead-pizza-dough

For the pizza, please feel free to improvise. Make it how you like it! I love thin crust and am bad about having tomato paste on hand, so my pizza "sauce" is usually just olive oil and garlic. Also, be careful to cut your veggies and other toppings thin/small and go easy. Thick layers of toppings make a soggy crust. Also, consider how you stack your pizza- greens burn so put them under cheese or throw them on the last few minutes. Otherwise- go to town with all the creativity you've got! Also, I highly recommend using pizza stones, a terra cotta planter stands work amazingly (the ones you set under the planter pot to catch the water, it looks like a large dish with a hole in the middle. )This heated up for at least 30 minutes before you toss your pizza in will make for the crispest crust possible in a conventional oven!

Here are two of my favorite combos to make in the winter:

Greens and Citrus Pizza:

 Preheat oven to 450*
Pick some greens:
3-4 large tough greens leaves (kale, chard, collards)-torn
and/or 1-2 cups arugula, spinach, mizuna etc.
Pecorino and mozzarella mixed
Thinly sliced citrus: limequats, kumquats, meyer lemons, limes etc THINLY SLICED

Assemble ingredients in order given. Citrus will burn, but that's delicious. Cook until the bottom of the crust is med-dark brown and/or the cheese begins to brown. Enjoy!

Butternut Pizza:

Thinly sliced parboiled butternut
Mozzerela and/or goat cheese
pepperoni
black olives
green onions

Assemble ingredients in order given. Cook as above. 


Wednesday, November 19, 2014

What on Earth is a Kohlrabi? What do I do with it? Slaw it! and the Real Deal on Actual Vegetables


There are a lot of veggies we grow in winter that are new to most people we serve. I think the largest reason is the shuttering of farmers markets in the winter. Think about it, google it. Most markets are seasonal, starting in with spring and ending in early fall. Where do the farmers go? Does the farm shut down in the winter? What's going on? 

Well, I can assure you the farm doesn't stop producing here in California. We can farm year-round with little interruption. Rain, frost, mud and all- we're out working. We personally, as a farm, don't go to markets in the winter because they are not profitable. I suspect many farms make this choice. But why? 

Vegetables. 

We just don't like to eat our vegetables as a society. But no, Ashley, I eat all kinds of good stuff in the summer- I practically drown in salsa! Ah, yes, summer "vegetables". I am going to break your heart, but most summer "veggies" are fruit. Tomatoes=fruit. Okra= fruit. Jalapenos= fruit (I fully intended for there to be a tilda over than n...I'm on a roll and I'm not googling hot buttons now!). Even eggplant, tomatillos, bell peppers, the whole summer she-bang is fruit. So yes, salsa is actually a fruit salad. So, what on earth is a real vegetable? 

Roots, shoots, stems, leaves, flowers and florets. 

Is the thing in your hand one of these? Congrats! You're going to eat a real veggie. 

Why don't we like them as much as these other things we thought of as veggies? Well, sugar is one big reason, but taste is the other. Kale, cabbage, bok choi, lettuce, radishes, greens of all kinds are all kind of... green tasting, bitter, leathery, even spicy. They're just not appealing until you've found a way to like them. This is the reason I believe we shut down farmers markets in the winter- we don't buy veggies, making it not financially viable to come to the market, meaning fewer markets and less exposure to "weird" winter vegetation. That sounds like a terrible catch-22. What to do? 

Well, our farm doesn't close in winter, and we have a whole boat-load of things growing that are wonderfully tasty and healthy and get packed in your boxes all winter. So, we'll learn together. 

This week, let's talk about Kohlrabi. 


Kohlrabi is a member of the brassica family. It is related then to broccoli, cabbage, turnips, and brussel sprouts. This fun tidbit comes from Wikipedia, The name comes from the German Kohl ("cabbage") plus Rübe ~ Rabi (Swiss German variant) ("turnip"), because the swollen stem resembles the latter, hence its Austrian name Kohlrübe." Here is how it grows out in our fields.


Yes, it does look like an alien egg or a horrible spider-vegetable hybrid.  I have actually found a soft spot in my heart (and stomach) due to it's flavor and texture. It is crisp, yet yielding so it crunches without being too chewy and tastes a lot like broccoli stem, only better! It is great roasted, stir-fried, tossed into a salad, or grated into a slaw!

They come in purple and green! To break into the goodness, snip or slice off the leaves that are left (they're edible too! eat them like greens!) and peel if you're using a storage variety or don't peel if it's fresh. Wait- how do I know which it is?! Is it smallish- fist sized or less and have a lot of healthy looking leaves? How are those scaby parts where the old leaves were cut off in the field- are they a little scabbed over or do they look leathery? If you have fresh leaves and fresh scabs you have a fresh one! Old or no leaves and old scabbing is a storage variety. Both are good to eat and can be used interchangeably, just peel the storage variety because the skin hardens to protect the plant and doesn't taste good because of it.

Now, you have met and aquainted yourself with your new brassica friend, what should you do with it? SLAW! Here is a fun, easy recipe to try out!


Kohlrabi and Carrot Slaw

1 Bunch carrots- grated or julienned
1 large kohlrabi- grated or julienned
1 bunch radishes- grated or julienned
1 C dried fruit
½ C nuts- chopped
Olive oil
1 Lemon-juiced
Maple syrup

Prep veggies and toss in bowl. Toast nuts and mix in with fruit (I suggest cranberries and your almonds!) Mix oil, lemon, and maple syrup together and dress salad. Enjoy!

Variations:
-Add spice! Hot and sweet!
-Add in a bit of cabbage for a more traditional slaw
-Add sprouts for an extra crunch
-Serve with pulled pork on a sammich!

Enjoy!

Thursday, November 13, 2014

Eating with Tender Heart Farms: Fall Celebration Salad and Mid-East Sammich


The most common complaint and cause for farm-box cancellation is, "I don't cook enough". As modern, busy people, I get that the last thing you want to do after 9 hours at the office, gridlock traffic and whatever familial obligations you have- dinner seems a pretty low priority. To be perfectly honest, after a long day of hoeing, transplanting thousands of plants, seeding, or harvesting vegetation- one of the last things I want to do is touch more vegetables. So, I get it...but I don't accept it.

It's a vicious cycle I find myself in often: you're tired don't want to cook, especially anything healthy, so you open the box of mac and cheese, break out the frozen burrito, or dial your trusty neighborhood take-out establishment. We're doing ourselves at least three disservice's here:

1.) This food is almost always not very healthy. It is full of comforting carbs and fats that make us feel satisfied initially, but are lacking in real nourishment like vitamins, minerals, vitamins and the like.
2.) Eating poorly makes us feel more tired...making us eat more poorly.
3.) It costs way more to eat out than to make the same things at home, and you would never add as much fat, sugar or salt as they do with processed foods.

This isn't revolutionary, or even controversial. We all know these things, yet we do it to ourselves anyway. Why? What are we saving time for? I can't answer that for you, but for me, when I engage in time saving dinner solutions, I don't use my saved time any more wisely. I'd wager the same is true for you, even if you'd never admit it out loud.

So what are we to do? Well, if you have come this far, and aren't already typing a scathing comment, you're probably in the boat of "Eating healthier is a priority for me, and I'd like to figure out how to do it more often". It's a long journey, and you have to accept yourself where you are. If you're new, this is all going to be strange and you're going to have to do some learning, actually, a lot of learning. Cooking and eating better takes time. There is planning, buying extra ingredients, stocking your pantry, research, and a lot of trial and error even before  you set in to chop two pounds of vegetation. You've got to assert for yourself that this is what you want and the work is worth it.

I'd like to start a series of blogs titled, "Eating with Tender Heart Farms". In it I will pick and prepare what I pack for my customers every week, proving that two people can easily make it through an average CSA type box each week. Honestly, I do this anyway, probably eating a box and a half, but I will keep track and take pictures so you can see what it looks like to finish a box a week. Please let me know if you think of something else that I can do in this series to help you through like keeping track of time in the kitchen or what else I buy or how much I am spending on extra ingredients or even what I eat the other 4 days I am not cooking the box (yes, one box almost always disappears into 3 meals with leftovers). I will also only use recipes I have given on here this past year so you can cook along with me!

Week 1

Box Contents:
Butternut Squash
Eggplant
Onions
Turnips with tops
Lettuce
Green Mustard
Kale
Radishes
Apples
Cucumber


I took the turnips and their tops, the garlic and the winter squash and added sausage, potatoes and a few pantry/fridge things to make this Autumn Shepherd's Pie. 
Here I took the lettuce, radishes, apple and cucumber and made the Fall Celebrations Salad. The recipe is listed below. The feta, garbanzos, and avocado addition made it really satisfying!

Not Pictured: Eggplant and Greens
Here I took the eggplant, some garlic, kale, onions and the mustard greens and made a dish that really highlights the best qualities of greens and eggplant.

Box= DONE!

Week 2:
Box Contents:
Pak Choi, Kale, Eggplant, Bell Peppers, Acorn Squash, Apples, Garlic, Pomegranate, Kohlrabi
I visited my friend Brooke and Keith's house for a weekend dinner. She bought some really beautiful salmon and we cooked up some brown rice to accent our stir-fry. I used the bell pepper and the pak choi from the box and added onion and tofu. You can find the recipe for an amazing stir-fry sauce Here.


This sandwich was amazing! I have become a huge fan of eggplant and greens together!  This is something to keep handy for lazy evenings. It's quick to make but doesn't taste that way! The recipe for all the components is down below! 

I made this C. Pepo Salad with the acorn squash, apple, pomegranate  and the rest of the kale. I added more lettuce, feta, and I subbed out maple syrup for pomegranate molasses. 
All of these meals were made the week I got the box, and all of them made leftovers for Tarra and my lunch the next day at work. A few made more than one day's leftovers, but seeing as how you only really cook 3 nights a week, that's a good thing for the other 4! 

How do you get through your boxes? What troubles do you have? Let's talk! Let's work it out! 


Here are the recipes for the past two weeks. Every other recipe is linked in the description. 


Fall Celebration Salad

1 head lettuce, chopped
2 apples, cored and sliced
1 bunch radishes, sliced
1 large cucumber, sliced
2 stalks celery, sliced
Blue cheese to taste

Prep and combine!
Serve with a honey Dijon dressing!

Variations to make it a full meal:
-Add chicken
-Add a hard boiled egg
-Add beans
-Add cooked whole grain
-Add nuts and croutons!
-Add sprouts!


Mid-East Sammich
Eggplant- sliced, drained, fried
Egg-fried
Onion Relish
Kale- chopped &massaged with curry oil
Feta

Slice eggplant, salt pieces and let drain in culinder for 10 min, fry in shallow oil. Fry egg. Assemble sandwich putting feta between egg and eggplant to melt.

Onion Relish
1 large onion-minced
lemon juice
cayenne

Assemble and let sit 20 min

Curry oil
1 tsp ea: ground: cumin, coriander, black pepper, turmeric, cinnamon
Add spice to oil, massage into kale (wear gloves!)

Wednesday, November 5, 2014

Johnson Grass, "Bloody" Tender Heart, and a Turkish Shepherd's Salad


This is my arch nemesis: Johnson grass root. As a weed, it is one of the nastier ones. It grows quick and will shade out and swallow any crop planted near it.  It has taken over a few areas of the farm, and we're doing our darndest to get rid of it. It has a few nasty tricks up it's sleeve though. 
Here is a close up of it's root: You can see that every nub you leave in the ground will grow a new plant. It is also clever enough to "let go" like a lizards tail if you try to pull it out. When left, it will grow like wildfire, sending its root out far, making new grass shoots at every root juncture. 

Digging sometimes leaves too much of the root, so we pulled out the ripper tooth to loosen the soil around the clumps so it would just lift out. In theory anyway...
We did have to go back and re-dig around the edges, aiming to get every bit of root. 

The dog even got into it. 


Here are a few of the "orphan" recipes from summer that got lost. These aren't entirely fall friendly, but you can keep them on tab for next summer! 


"Bloody" Tender Heart

1 large heirloom tomato
1 large bell pepper
1 med onion
2 stalks celery
2 cloves garlic

Spread veggies out in a glass dish sprinkle lightly with salt and olive oil. Roast at *450 until veggies begin to color and wilt (garlic and celery may need to come out first).  Remove veggies and pop into a blender. Strain juice through a large strainer and let cool.

¼ C lemon and lime juice
1 Tbs Tabasco
1 Tbs fresh grated horseradish
½ Tbs Old Bay Seasoning
8 dashes Angastora Bitters
6 oz vokda
2 stalks Celery

Assemble and enjoy! 


Turkish Shepherd’s Salad

1 med onion, sliced
1 head lettuce, chopped
1 bell pepper, diced
2 small cucumbers, diced
1 small bunch radishes, sliced
2 tomatoes, diced
Herbs (parsley, mint, cilantro, basil, dill)
3 green onions, sliced

Prep and toss!

Dressing: 2 lemons, olive oil, fresh ground pepper, musturd powder, honey all to taste
-combine and whisk

Add ins:
Olives of every kind
Feta
Za’atar
Chopped Pita
Toasted Nuts
 

How to butcher a squash: Meet my friends, Cucurbata Pepo and stab/roast them into a fall salad


These beauties are all cultivars of the botanical species: Cucurbata Pepo. Not pictured are the summer squash like zucchini  pattypan or crookneck, though they are also part of this species of squash. The whole cucurbit family as a genus includes: melons, cucumbers, watermelons, gourds, summer and winter squash. These winter squash pictured are all the "oddball" types. With the other winter squash family, "Cucurbata moschata" one method will work with all of them. Here, you must first know which cultivar you are dealing with before you decide where and how it will end up in your meal. 

This one might seem familiar to most people.  We're comfortable stabbing it in the face decoratively and letting it rot on our porch for awhile, but eating it might be new. The best way to break the pumpkin down for cooking is to first find where it likes to sit flat. Sometimes that is this way pictured, and sometimes it is on it's ground spot (where it sat on the ground and is differently colored and slightly flattened). Take a large, heavy chef's knife and stab it in the face, careful of your hands. Once the initial cut is made, tip the pumpkin and continue the cut with the knife longitudinally so you have two mirrored halves. The stem will give you trouble, do your best. Scoop the seeds, and clean and save for roasting! Roast your halved fruit with a bit of oil on a cookie sheet, cut side up on 350* until a knife slides easily though. Let cool out of the oven and scoop out flesh for puree or use a melon baller for putting in salads. You can also stuff these guys and leave the flesh in like a pumpkin bowl, or scoop the flesh out mix in stuffing, and serve in the half. 

This member of C. Pepo is a spaghetti squash. Aptly named for its stringy nature. Like with the pumpkin above, we need to halve it to get to the good stuff. This one is tricky though, as it really doesn't lay flat. A large, heavy knife is your best friend here. Lay it parallel with the knife so you're going to cut it in half the long way, remove all hands, children and pets from the danger zone, and WHACK! I find aiming to use the heavier butt of the knife gives me more umph. Once you have an initial cut, you should be able to finish the job a bit safer. Again, the stem will give you trouble. Gently clean out the seeds (you may eat them) and roast at 350* until tender. When ready, remove and let cool slightly. Take a fork and rake lengthwise to liberate the squash "noodles". People like to eat this like spaghetti with red sauce, but I think a garlic parmesan treatment serves the squashes flavor better. 

This C. Pepo member is an Acorn Squash. It has a thick, firm flesh that is good eating, but not great puree-ing. I love to stuff this one with meaty-bready stuff, topped with cheese and nuts. Though you can scoop out bits with a melon baller once cooked and add to a grain salad, green salad, soup, etc. The breakdown is similar to spaghetti. It probably won't sit very still or flat, so a hands-free WHACK is your best bet. It roasts up the same. 

These two have got to be the most user-friendly, last minute dinner addition, cutest members of C. Pepo.  Pictured here are (left to right) a sweet dumpling and delicata squash. They are thin skinned, thin fleshed beauties that are delicious and simple to use. WHACK them in half, scoop seeds and roast. OR, if you're super in a hurry, stab 6ish times in the face and pop into the microwave following your machines instructions for hard vegetables (likely potato button). These guys also have really thin skin that can be eaten! I love to roast delicata and slice into a salad with peppery, bitter lettuces. 


The recipe below would be wonderful with either the delicata, dumpling, acorn, or pie pumpkin. The spaghetti squash might be too grainy and not sweet enough, but if you really want to- go try it out!

C. Pepo Fall Salad

1lb squash- roasted and sliced or melon balled
1 bunch kale- massaged
1 pomegranate- de-seeded
2 apples- cored and sliced
2  lemons- juiced
1/2 C maple syrup
Olive oil
Pistachios or hazelnuts- toasted

Prep all veggies and fruit- add to bowl. Mix lemon juice, maple syrup, and oil in a separate bowl- salt to taste. Add to salad with toasted nuts and enjoy!

Variations to fill out for a meal:
-Add garbanzos
-Add a whole grain
-Add sprouts
-Add peppery greens like arugula or cress
-Add feta, blue cheese, hard salty cheese, or havarti